Each day you will have a list of tasks in your Checklist to complete, which are related to the care program(s) you are currently assigned to. These tasks may include new articles to read, medication reminders that you’ve set, or check-in surveys for you to complete for your care team. When you complete the tasks each day, your checklist will refresh and show new tasks the next day. Your care team uses the activity from your checklist to stay connected and up to date on your progress.
Checklist Sections
Your checklist will be split into several different sections, depending on the tasks you are due to complete.
The “+ Add” Button
Medication/Health Reminder – You can add new medication/health reminders from this screen by tapping the “+ Add” button at the top right, and selecting which type of reminder you wish to create. Once created, your new medication and/or new health reminders will be viewable and editable in the Profile tab.
Care Program – Additionally, from the “+Add” menu, you can also view our range of available Care Programs and submit a request to enroll in the one(s) you are interested in.
NOTE:For more guidance on how to set up reminders, please view this article for steps to create both medication and health reminders. For more guidance on how to view and request enrollment in further Care Programs, please view this article.
“Today” Section
This section shows any outstanding tasks you have remaining for the day.
Any tasks related to care program(s) you are enrolled in will show the name of that care program below the title of each task. This makes it easier, especially for those enrolled in multiple care programs, to identify which tasks relate to which program.
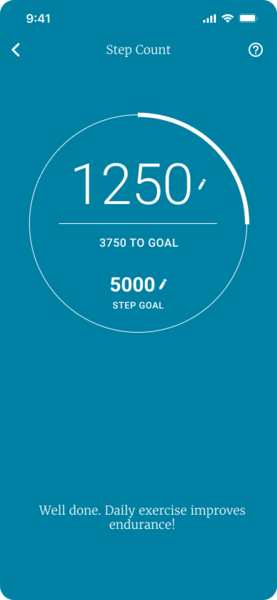
Step Count: Tap the task to see your live step count tracking automatically. Here you can edit your step goals and edit your step count manually if you do not have automatic tracking turned on. Once you reach your Step Goal for the day, the task will automatically be marked as complete.
Medication Reminders: Tap on the reminder, then tap “Yes” or “Yes to All” to acknowledge you have taken your dose(s).
Health Reminders: Tap on the reminder, then tap “Complete” to acknowledge the reminder.
Articles: Tap on the task to read the article and/or watch any video content to learn more about your health. Once you have completed the task, tap the backwards arrow at the top left of the app to return to the checklist.
Check-Ins/Surveys: Tap on the task to open the survey, then tap Start Survey. Your responses will be shared with your care team which will help them have greater insight into how you are doing each day. Once you have completed the survey, tap Return to Checklist.
Encouragements: Tap on the task to read the encouragement, then tap the backwards arrow at the top left of the app to return to the checklist.
“Complete” Section
When you have completed a task, you will hear a ding! The task will then leave the top of your checklist and appear at the bottom under the “Complete” section, with a green check-mark next to it.
If you forget to do your tasks, don’t worry! Your Daily Checklist refreshes each day at midnight. Even if you forget to record your progress on the app, it is still important to take your scheduled medications, exercise, and eat well!
Step Counter
*Automatic step counting can only be carried out on the mobile version of our app and cannot be carried out on a tablet. Tablets do not connect to the respective health apps needed for tracking, only mobile devices. If you use both the mobile and tablet versions of our app, you will see your step count data updated periodically on the tablet app after you access the mobile app.*
The app can track the steps you walk in a day automatically. With automatic tracking, your mobile device will track your steps by synching to either the Health Connect or Apple Health app. Setting up this feature is quick and easy!
Note: You will need to download the “Health Connect” app from the Google Playstore if your device is version 13 or lower.
Connect Your Device to Either Apple Health or Health Connect
Open the app and tap the “Step Count” task on the Checklist tab.
Tap on “CONNECT NOW” (or if you do not want step tracking enabled, tap on “DON’T ASK ME AGAIN”).
You will be brought to the “settings” screen (this will be Apple Health for iPhone users, or Health Connect for Android users).
Click on (App permissions)
Select “Allow All” for Wellframe access.
Note: For new users, you will be prompted to connect after you complete creating your account for the app!
Once you are connected, your steps will automatically sync with either Apple Health or Health Connect.
Note: If you wish to enable Step Tracking later, you can do so by going to your “Profile” tab, click on the “Settings” icon in the upper right corner, click on the “Step Count” option and toggle both options to “ON”.
*If you are still having issues with your Android Device, after connecting to Health Connect, please see this articleHERE.*
Editing Your Daily Step Goal
A daily step goal is typically already configured for you when you start a Care Program with step counting. To modify your daily step goal:
Click on your “Step Count” checklist item.
Click on the “pencil” icon next to your STEP GOAL.
Enter your updated “step goal.”
Click “SAVE.”
Note: Your Care Team also has the ability to update your step goal!
Manually Adding/Editing your Daily Step Count
If you connect the app to Apple Health or Health Connect and are tracking your steps using a device that does NOT currently sync with Apple Health or Health Connect, your step count may appear inaccurate. You can update these steps manually in the app to reflect the accurate step count according to your step tracking device.
If you are not connected to either Health Connect or Apple Health, but would like to record your daily steps from another device, you can add them here as well:
Tap on your “Step count” checklist item.
Click on the pencil icon next to the current step count.
Enter the correct number of steps.
Click “SAVE.”
Note: You also have the option to revert to the Health Connect or Apple Health count by clicking the “Revert to….” option in the edit screen, after making a change.
Viewing Your Step Count Progress
Checklist Tab
A progress bar will appear on your daily “Step count” checklist item allowing for “at-a-glance” tracking of your goal. The bar updates each time you reload your checklist. If you click on the checklist item, it will bring you the screen that will show you your current step count and step goal for the day.
Progress Tab
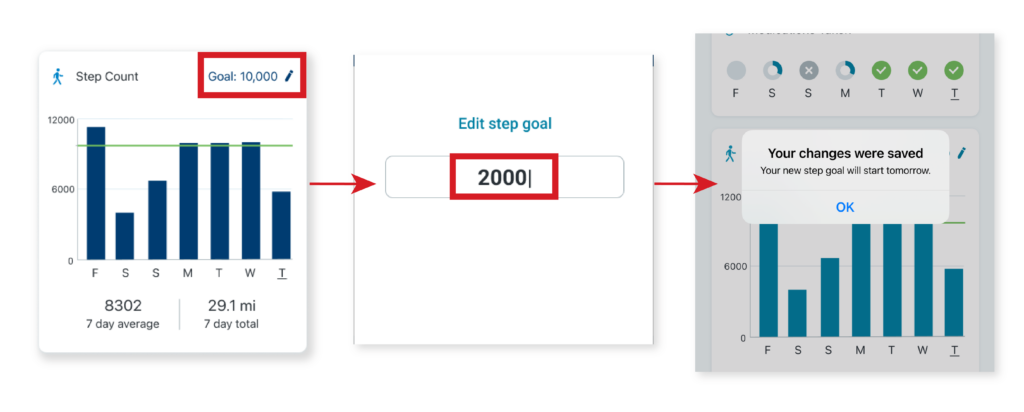
To see your past week’s step activity, scroll down to the Step Count widget. This displays a graph of the past 7 days of your step activity. You can also edit your goal from this screen by tapping the pencil icon next to the existing goal on the top right corner of the widget.
Progress Tab
Whether it’s your daily step count, medication adherence, blood sugar readings, or weight, all your information is easily accessible on this tab!
Progress on Checklist completion and Medication Adherence
Daily Step Tracking Progress
Biometrics Graphs (Must be enrolled in Biometric Care Programs)
Maternity Dates
Surgical Procedure Dates
Checklist and Medication Adherence
Daily indicators will display, via widgets, of your progress for the current day and the previous 6 days for:
Checklist Item completions.
Medication adherence for the week.
Your progress is indicated by circles that change depending on what you have completed.
Full Gray Circle: You did not have any reminders/tasks due that day.
Full Gray Circle with X: You did have medications to take that day, but you did not mark them as taken.
Partial Gray: Percentage of reminders/tasks that have not been completed for that day.
Partial Blue: Percentage of reminders/tasks that have been completed for that day.
Green Circle with a Check Mark: 100% of your reminders/tasks have been completed for that day.
Step Counter
Note: If you currently do not have your “Step Counter” configured, please go here for the configuration instructions.
The Step Counter automatically records daily steps. Each day, an item will appear on your checklist, showing the progress towards your daily step tracking goal!
On the Progress tab, you will have a graphical representation of:
Your steps for the present day and the last 6 days.
Your total average for the last 7 days.
Your step total for the last 7 days in miles.
This graph also allows you to “edit” your Step Goal by tapping the pencil icon on the top right of the graph, enter a new goal and then tap Save. Your new step goal will begin the next day.
Graphical Representations of Biometrics
(Note: You must be enrolled in the applicable Biometric Care Program to see these graphs):
Blood Sugar Readings – Displays the past 7 days of recordings.
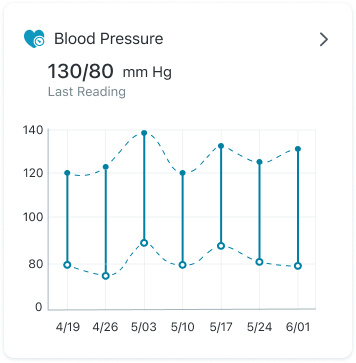
Blood Pressure Readings – Displays the last 7 recordings with dates.
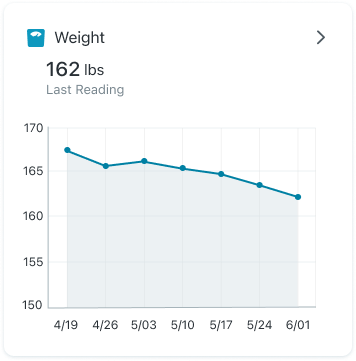
Weight – Displays the last 7 recordings with dates.
Blood Sugar Tracking
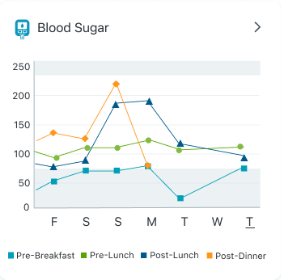
If you are enrolled in a biometric blood sugar program, you’ll be able to record and track your blood sugar levels for the current day and previous 6 days, displaying how they compare to the recommended range.
Note: For more information on how to record your blood sugar by connecting your glucometer, see this article.
Every day, when you enter your blood sugar reading from the checklist, it will show up on this graph. If you are in more than one blood sugar program, each reading will be a different color.
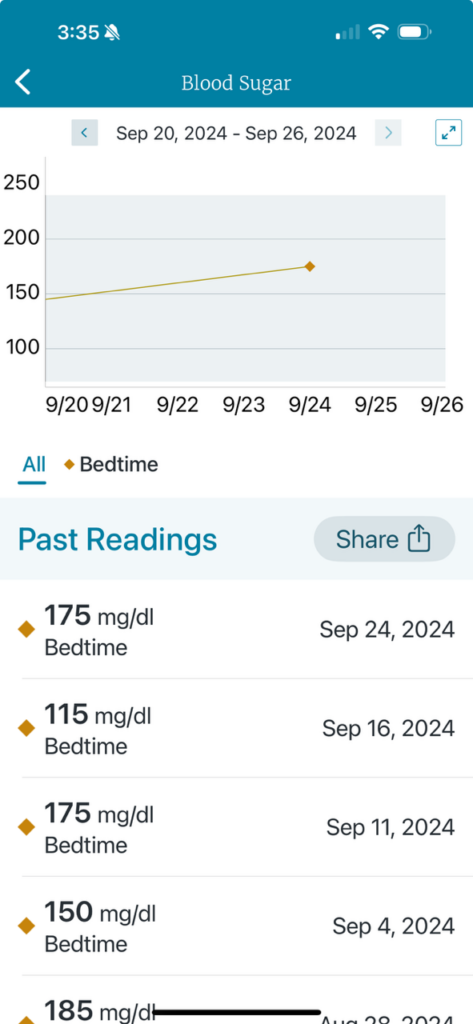
The graph shows the last 7 days, including today. To see older readings, click the arrow in the top corner of the graph.
This will take you to a screen where you can scroll through past dates and see your readings in a list format.
You can also share (export) your list of readings by clicking the “Share” button.
To enlarge the graph in this view, click on the “expand” icon in the upper right corner of the screen.
Blood Pressure Widget
If you are enrolled in a biometric blood pressure program, you’ll be able to record and track your blood pressure readings by entering your reading via a checklist item.
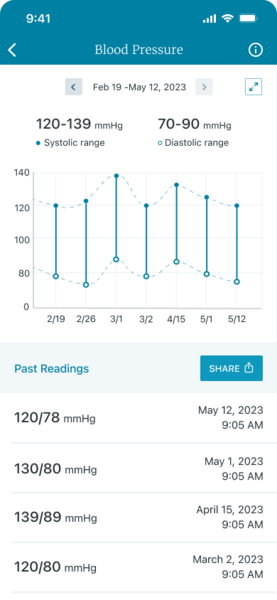
When you enter your blood pressure reading from the checklist, it will show up on this graph. Blood pressure numbers are on the left (Y-axis), and the dates the readings were taken are on the bottom (X-axis)
The graph shows the last 7 recorded readings. To see older readings, click the arrow in the top corner of the graph.
This will take you to a screen where you can scroll through past dates and see your readings in a list format.
To enlarge the graph in this view, click on the “expand” icon in the upper right corner of the screen.
Weight Widget
If you are enrolled in a weight tracking program, you’ll be able to record and track your weight readings by entering it via a checklist item.
When you enter your weight from the checklist, it will show up on this graph.
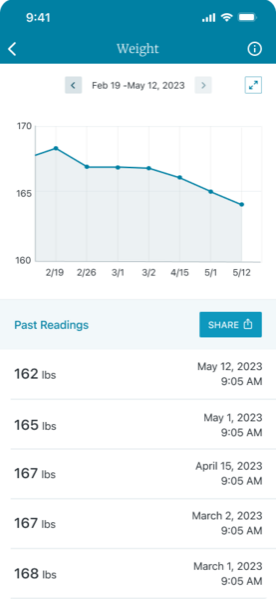
The graph shows the last 7 recorded readings. To see older readings, click the arrow in the top corner of the graph.
This will take you to a screen where you can scroll through past dates and see your readings in a list format.
You can also share (export) your list of readings by clicking the “Share” button.
To enlarge the graph in this view, click on the “expand” icon in the upper right corner of the screen
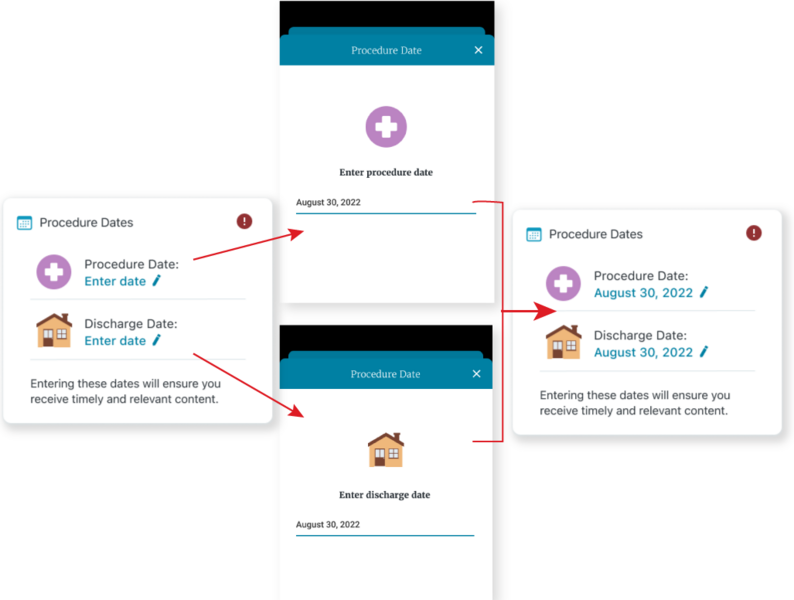
Procedure Dates
If you are enrolled in a program specific to procedure/health dates (such as an upcoming or completed surgery) you can add, view, and edit these dates within the Progress tab. This ensures the content you receive from your Care Program is in line with the correct stage of your healthcare journey.
You can add dates by tapping the pencil icon next to “Enter Date”, then scrolling through the date picker to select the correct Month, Day, and Year.
You can also edit these dates afterwards by tapping the pencil icon next to the currently displayed date.
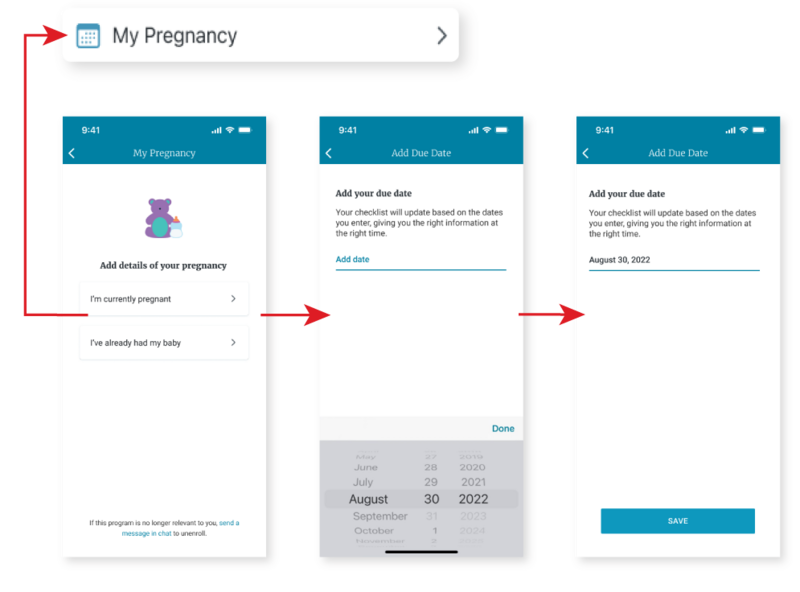
Maternity Program
If you are in a maternity program, you’ll be able to track progress and make updates. You’ll be able to update pregnancy status (whether currently pregnant or delivered), add/update your estimated due date, or unenroll from the program.
When the “My Pregnancy” widget on your Profile tab displays a red circle notification, you can tap this and enter the relevant dates of your pregnancy whether you are currently pregnant (Due Date), or if you have already had your baby (Delivery Date). Entering these dates accurately will make sure you receive the most relevant program content in relation to the stage of your pregnancy journey.
Note: If you have NOT yet delivered, please DO NOT enter a Delivery Date. Content delivered for your personal experience is driven off the dates entered in this section.
Requesting Enrollment in a Biometrics Care Program
From the profile tab, you can request enrollment in certain Biometric Care Programs empowering you to take control of your healthcare journey!
The following programs are available to request (Note: if you do not see one of these options available to you, please send a “chat message” to your Care Team via the app):
Weekly Weight Tracker
Daily Weight Tracker
Prenatal Weekly Weight Tracker
Pediatric Weekly Weight Tracker
Pediatric Daily Weight Tracker
Prenatal Daily Blood Pressure Tracker
Pediatric Daily Blood Pressure Tracker
Weekly Blood Pressure Tracker
Daily Blood Pressure Tracker
Morning Blood Pressure Tracker
Afternoon Blood Pressure Tracker
Evening Blood Pressure Tracker
To request enrollment (Note: You can only request enrollment for 1 of these Care Programs at a time):
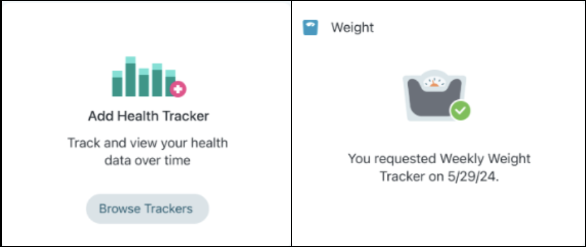
Scroll down to the bottom of the Progress screen (or click on the “Widgets” icon in the upper right of the screen and click “Add Health Tracker”.)
Click on the “Browse Trackers” button in the “Add Health Tracker” widget.
Drill in the appropriate category (Weight or Blood Pressure)
Choose the specific Tracker you would like to enroll in
Click the “Request to Enroll” button. (You will receive a confirmation pop-up, click “Request” to send the request to your Care Team.)
The “Add Health Tracker” widget will be replaced by a Widget displaying the requested Tracker name and date of the request.
Once your request is approved, you will start to receive items in your checklist to record your readings, which will then be added to the applicable graph on the Progress screen.
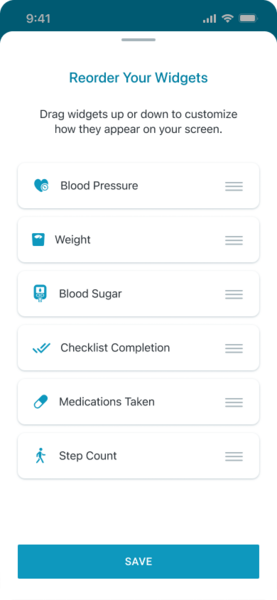
Organizing the Progress Tab
The Progress tab provides you with an option to rearrange the order that your health tracker widgets are displayed, so you can prioritize which are the most important to you!
Note: You cannot remove any of the widgets. Additionally, if you are enrolled in a date-based program (such as maternity or medical procedure programs), you will not be able to move the “dates” widget and it will remain at the top of the Progress tab until that program has ended.
To reorder the Progress tab widgets:
Open the Progress tab and tap the “widgets” icon on the top right of the screen. This will display a list of widget titles, with triple bar icons to the right of each title.
Press and hold the triple bars icon on the widget you would like to reorder and drag it into the spot you wish it to move to.
Once you are happy with the newly arranged order, tap SAVE at the bottom of the app.
This will return you to the Progress tab, where you will see all your health widgets in your newly chosen order.
Glucose Monitoring
Members with diabetes may be able to participate in Wellframe Diabetes and Blood Glucose Biometric care programs. In the app, you’ll be able to monitor your blood sugar, and access insight into trends to discuss with your Care team to better manage your blood sugar.
Note: Not all app sponsors support the Glucometer Integration. If you are unsure if this is a supported feature for you, please contact your care team in the app by using the chat feature to learn more.
Connecting Your Device to the App:
When the glucometer integration is enabled, and if you are enrolled in a blood sugar biometric program, you will be prompted to pair your device.
Note: If you dismiss this prompt, you can retrigger the pairing flow at any time by tapping “SYNC WITH A DEVICE” on a blood glucose survey task, or from the ‘connected devices’ menu in settings.
Click “CONNECT NOW” to begin the synchronization flow.
Select the device you are using. This selection is saved in “settings.”
Once you have paired your device, tap “SYNC WITH A DEVICE” on a blood glucose survey, moving forward, to pair your reading.
There are three types of integrations that are supported:
OCR: If your glucometer device is an OCR device, (optical character recognition), your phone camera will launch. Hovering the phone camera over your device will upload the reading into the app.
Bluetooth: If your glucometer device is a Bluetooth device, the app will scan for new readings in the background and the readings will be presented to you in a list. You can then select the applicable reading to be uploaded into the app. Any readings that were previously synced will be grayed out and will not be able to be selected again.
Apple Health: Readings synced into Apple Health from your glucometer’s device manufacturers app will sync into Wellframe via Apple Health. See below for integration steps.
Once you have selected a reading and tapped ok (Bluetooth or Apple Health) or used the camera to read in a new blood glucose reading (OCR), the reading will populate the entry field in the survey response. Click “SAVE.”
Note: You will always have the option to edit the number before submitting the survey response.You can view, add, remove, resync devices, or change which device is primary in the app settings menu.
Connecting Via Apple Health
(OPTIONAL – Applicable to iPhone Users ONLY).
Confirm your glucometer’s device manufactures app has been synced to Apple Health.
On the iPhone, Go to Settings > Scroll down to Health app > click on “Data Access & Devices”. Confirm the Wellframe app displays.
Tap Wellframe, confirm “ALLOW WELLFRAME TO READ DATA” > “Blood Glucose” is enabled.
When “syncing”, select “Apple Health” from the Connected Devices menu, instead of your glucometer device.
Compatible Glucometers
Below is a list of current compatible devices. If you do not see your model listed below, please check back for updates. If you do not have a Wellframe compatible device, you can still track your blood glucose readings through the app by manually entering your blood sugar readings.
Source
Device
Abbott
Abbott FreeStyle Freedom Lite Glucose Meter
Abbott
Abbott FreeStyle Lite Glucose Meter
Abbott
Abbott FreeStyle Precision Neo Glucose Meter
Abbott
Abbott FreeStyle Precision Xtra Glucose Meter
Accu-Chek
Accu-Chek Aviva Connect Glucose Meter
Accu-Chek
Accu-Chek Guide Glucose Meter
Accu-Chek
Accu-Chek Guide Me*
Accu-Chek
Accu-Chek Instant Glucose Meter
Accu-Chek
Accu-Chek Aviva Plus Black Glucose Meter
Accu-Chek
Accu-Chek Aviva Plus Silver Glucose Meter
Accu-Chek
Accu-Chek Compact Plus Glucose Meter
Accu-Chek
Accu-Chek Nano Glucose Meter
Accu-Chek
Accu-Chek Performa Glucose Meter
Accu-Chek
Accu-Chek Performa II Glucose Meter
Agamatrix
Agamatrix Jazz Wireless 2 Glucose Meter
Ascensia Diabetes Care
Ascensia Diabetes Care Contour Next 7901H*
Ascensia Diabetes Care
Ascensia Diabetes Care Contour Next 7902H*
Ascensia Diabetes Care
Ascensia Diabetes Care Contour Next One Glucose Meter*
Ascensia Diabetes Care
Ascensia Diabetes Care Contour Plus One Glucose Meter*
Bayer
Bayer Breeze 2 Glucose Meter
Bayer
Bayer Contour Glucose Meter
Bayer
Bayer Contour Next EZ Glucose Meter
Bewell Connect
MyGluco
CVS
CVS Health Advanced Bluetooth Glucose Meter
CVS
CVS True Metrix Air Glucose Meter
CVS
CVS True Metrix Glucose Meter
CVS
CVS True Result Glucose Meter
CVS
CVS True Track Glucose Meter
LifeScan
LifeScan OneTouch Verio Flex Glucose Meter
LifeScan
LifeScan OneTouch SelectSimple Glucose Meter
LifeScan
LifeScan OneTouch Ultra2 Glucose Meter
LifeScan
LifeScan OneTouch UltraMini Glucose Meter
Nipro
Nipro True Metrix Air Glucose Meter
Nipro
Nipro True Metrix Glucose Meter
Nipro
Nipro True Result Glucose Meter
Nipro
Nipro True Track Glucose Meter
Relion
Relion Confirm Glucose Meter
Relion
Relion Prime Glucose Meter
Relion
Relion Ultima Glucose Meter
Rite Aid
Rite Aid True Metrix Air Glucose Meter
Rite Aid
Rite Aid True Metrix Glucose Meter
Rite Aid
Rite Aid True Result Glucose Meter
Rite Aid
Rite Aid True Track Glucose Meter
Walgreens
Walgreens True Metrix Air Glucose Meter
Walgreens
Walgreens True Metrix Glucose Meter
Walgreens
Walgreens True Result Glucose Meter
Walgreens
Walgreens True Track Glucose Meter
Chat Tab
The “Chat” tab is where you will be able to communicate directly with your care team at any time through a secure two-way messaging system. It’s just like text messaging, only more secure to protect your health information.
Note: Your care team may not respond immediately. If you need to speak to a doctor or in case of an emergency, please call emergency services or your doctor directly. Wellframe should not be used in emergencies.
Attachments
The “Chat” tab enables you to securely send and receive attachments between you and your Care Team, including photos and files (such as pictures of an injury, discharge instructions, or a medical bill you would like to discuss).
How to add an attachment:
Tap on the Chat tab in the app. (Note: if this is your first time using the Chat tab, a message will pop up explaining what the Chat feature is for, and how it can benefit your experience with the app).
Click on the “+” menu to the left of the text box.
You will then be given 3 attachment options:
Photo Library: Choose a photo from the existing saved images on your device (you can choose up to 10 images at 1 time).
Take Photo: Take a brand-new photo with your device camera.
Choose File: Attach a document saved on your device.
Once you have attached your preferred file(s), you can add text in the text box to provide context or further information related to the attachment, if necessary.
To send your attached file(s) and message, tap the send button (the paper plane icon to the right of the text box).
File Types & Limits
Supported file types:
.pdf.
.jpg/.jpeg (Note: iPhone iOS image default is .HEIC, which we will convert to .jpg on upload).
.png.
File size limits:
The maximum file size limit is 2 MB.
Any images you upload via the app, larger than 2MB, will be automatically resized to stay within a 2 MB maximum file size.
PDF files over 2 MB will not be automatically resized, and you will need to resize them yourself before being able to upload.
Virus scanning:
Every file uploaded is scanned to ensure it is safe to save and open.
A message will display if a file does not pass the security check, and the file will not be saved or displayed if it does not pass.
Deleting attachments:
You and your Care Team will be able to delete any attachments that you have uploaded via the app, however you will not be able to delete any attachments uploaded by your Care Team.
After deletion, a message will display for both you and your Care Team, showing who deleted the file & when it was deleted.
Instructions
Your Care Team can also send instructions and important information to your app that you can access easily, without scrolling back through your conversations to find.
The clipboard icon at the top left of the Chat tab will contain any instructions or important information you and your Care Team wish to keep in one place.
If you have notifications set up for the app, you will receive a prompt any time your Care Team has added, or edited, something in your instructions.
Resources Tab
The Resources tab contains a Library of educational articles about your health, and a list of our available Care Programs which can be viewed by “Health Topic”.
Library
Our Library articles may be specific to your condition or procedure, your medications, or offer general healthy lifestyle tips, however they will also cover many other topics that you may be interested in. You can save any of the article you view to your “Favorites” list by tapping on the hollow star at the bottom center of an article. Once favorited, the star will turn solid white. Your favorite articles can then be easily accessed at any time in the Library screen by clicking on “View All Articles” and then tapping on the “My Favorites” tab. NOTE: All the articles that appear in your Checklist can also be found at any time in the library.
Care Programs
The Resources Tab features an expandable list of our Care Programs available for you to browse, and request to enroll in if you are interested.
To view specific Care Program details:
Tap “View all health topics” (below the 4 initial examples), and a new screen displaying an extensive list of various Care Program health topics will appear
Scroll through and tap on any of the available health topics to see a list of each Care Program available to you under that topic
Tap any of these Care Program names to view a description of the specific program, and what to expect in terms of content type and program duration
Requesting to enroll in Care Programs
When you find a Care Program you would like to enroll in:
Tap the “Request to Enroll” button at the bottom of the screen
This will generate a pop-up box explaining that your request will be sent to your Care Team to approve, and if you have any further questions, you should contact them directly to discuss
If you wish to go ahead with the request, tap “Request”, otherwise tap “Cancel”
Finally, if you tapped “Request”, a pop-up box will let you know the request has been successfully sent, confirming you will be notified whether the request is approved or denied
Once a Care Program has been requested, you will see a “requested” notice next to the program title in the list view.
NOTE: You can only request ONE care program at a time. Until your Care Team has approved or declined your current, you cannot request to join another program as these are reviewed on a case by case basis. You can, however, tap “Chat with your Care Team” on any other programs you may be interested in to discuss them with your Care Team.
Request Approved
If your Care Team approves your request to join a Care Program, you will receive a notification on your device home screen stating, “Program Request Approved”
If you are already using the app at the time of approval, you will instead see a box appear at the bottom of the app screen confirming the same with an option to “View” the full approval screen so you can get started.
Request Declined
If your Care Team decline your request to join a Care Program, you will receive a notification on your device home screen stating, “Program Request Declined”
If you are already using the app at the time of approval, you will instead see a box appear at the bottom of the app screen confirming the same with an option to “Message” your Care Team to further discuss your health goals (this will take you to the Chat tab)
Profile Tab
The Profile tab is where you will see the number of days you have been using the app, further details on the care program(s) you are enrolled in, and where you can manage your medication and/or health reminders. You can also access your account settings by tapping the gear icon on the top right of the tab.
Enrolled Care Programs
Here is where you can see which care program(s) you are enrolled in. Tapping the care program card of your choice will enable you to view more detailed information about the program. You can exit the expanded care program information screen by tapping the backwards facing arrow at the top left of the tab.
Expanded care program information will include:
Description of your care program.
Expected duration of your care program.
The type of content included within your care program.
Ability to easily chat with your care team via the “chat with care team” button.
Reminders (Medication and Health)
Medication Reminders
Medication Reminders are critical to the overall success of your care management journey! The app offers a comprehensive Medication Reminder feature that is easy to configure and enables you and your Care Team to manage your medications.
To Add a Medication Reminder:
You can add a medication reminder from multiple areas within the app.
Checklist Tab: Tap the “+ Add” button in the top right corner of the screen, then choose “Medication Reminder.”
Profile Tab: Scroll down and tap the “+ Add Medication” button on the screen.
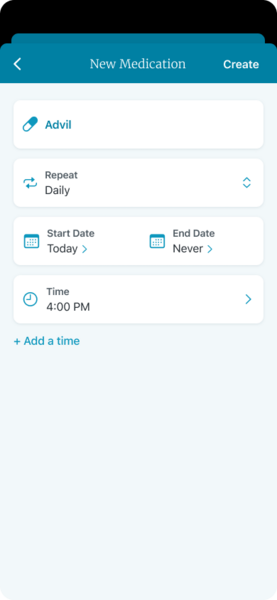
Type the name of the medication you will be taking. Suggestions that match what you are typing will start to appear for selection after you have entered 3 or more characters.
Select the matching medication.
If you don’t see any suggestions while typing, you can manually enter the medication name. Feel free to include emojis and special characters! When you’re done, click the +Add button to save the medication name for your reminder.
Once you have added the Medication name, tap onto the “Repeat” field to choose how often your reminder should occur.
Your choices are:
One time
Daily
Weekly – If you choose weekly you can select which day of the week you want your reminder to occur.
Monthly, – If you choose monthly you can select which day of the month you want your reminder to occur.
Custom. – this option will provide you with an additional option where you can choose the number of times you wish the reminder to repeat in days, weeks or months (depending on the choice you make).
This will also provide an additional option (below the “start date/end date”), in which you will be prompted to choose the day of the week or date of the month you wish the reminder to occur.
Next, choose a “start date” and “end date” for the reminder.
If you chose an end date, make sure the “Set End Date” toggle is turned on.
If you don’t want the reminder to end, leave this set to “Never.”
Finally, choose the time that you would like the reminder to occur by tapping the “Time” option. Note: Tap “+ Add a time” to set additional times per day if needed (maximum of 12-time entries per day, per reminder).
Tap “Create” at the top right of the screen.
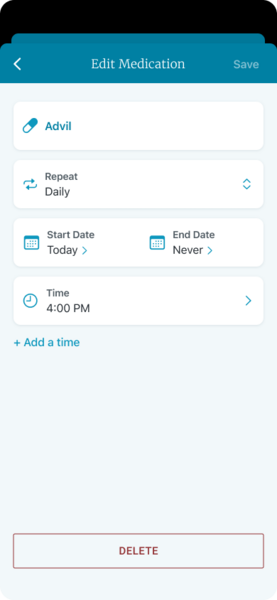
To Edit a Medication Reminder:
In the “Profile” tab, scroll down and select the medication reminder you wish to edit (you may need to tap “Load More” if you have more than 5 active medication reminders).
Tap the desired field(s) you wish to edit and make your changes.
Tap “Save” at the top right of the screen.
Note: Any edits to a reminder will go into effect the following day – if you have not completed today’s reminder, you will still see it in your checklist today.
To Delete a Medication Reminder:
In the “Profile” tab, scroll down and select the medication reminder you wish to delete (you may need to tap “Load More” if you have more than 5 active medication reminders).
Tap the “Delete” button.
Health Reminder
In addition to Medication Reminders, you can also set reminders for other health-related activities. For example, you could set a reminder to “Drink Water”, or to “Take a Walk”.
To Add a Health Reminder:
You can add a medication reminder from multiple areas within the app.
Checklist Tab: Tap the “+ Add” button in the top right corner of the screen, then choose “Health Reminder.”
Profile Tab: Scroll down and tap the “+ Add Health Reminder” option on the screen.
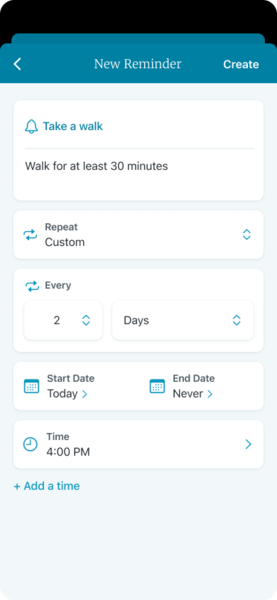
Enter the “Name” of your reminder.
Enter an optional note. This note will be visible when the reminder is opened from the Checklist tab and will also be visible to your Care Team.
Once you have added the Health Reminder name, tap onto the “Repeat” field to choose how often your reminder should occur.
Your choices are:
One time
Daily
Weekly – If you choose weekly you can select which day of the week you want your reminder to occur.
Monthly, – If you choose monthly you can select which day of the month you want your reminder to occur.
Custom. – this option will provide you with an additional option where you can choose the number of times you wish the reminder to repeat in days, weeks or months (depending on the choice you make).
This will also provide an additional option (below the “start date/end date”), in which you will be prompted to choose the day of the week or date of the month you wish the reminder to occur.
Next, choose a “start date” and “end date” for the reminder.
If you chose an end date, make sure the “Set End Date” toggle is turned on.
If you don’t want the reminder to end, leave this set to “Never.”
Then select the start date, time, and frequency of the reminder.
Then tap “Save.”
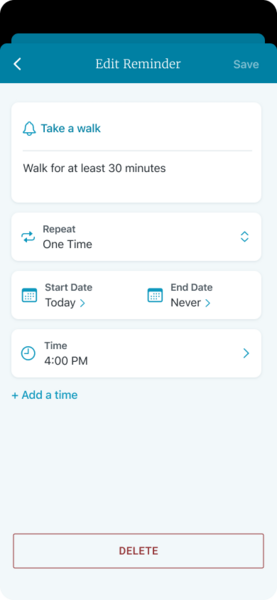
To Edit a Health Reminder:
In your “Profile” tab, scroll down and select the health reminder you wish to edit (you may need to tap “Load More” if you have more than 5 active health reminders).
Then tap “Edit” in the top right corner.
Here, you can edit the name, date, frequency, or time of your health reminder.
Tap “Save.”
Note: Any edits to a reminder will always go into effect the following day – don’t be alarmed if you still see your original health reminder in your checklist today.
To End a Health Reminder:
In your “Profile” tab, scroll down and select the health reminder you wish to edit (you may need to tap “Load More” if you have more than 5 active health reminders).
Tap “Delete.”
Note: Deleting a reminder will go into effect the following day – if you have not completed today’s reminder, you will still see it in your checklist today.
Settings
The Settings menu resides in the Profile Tab and can be accessed by tapping the settings icon (cog wheel) in the top right of the screen.
This menu provides access to Privacy Policies and enables you to control and customize how you want the app to function.
Account
Email: The email address registered to your account.
App Access: Your insurance provider name and contact information.
App Version: The version of the app you currently have installed.
Manage Account: The version of the app you currently have installed.
Cancel Account: Tapping this option will take you to the Chat tab and pre-populates a message to your care team asking that they cancel your Care Management account. The Care Team will then respond to discuss this request with you to confirm your decision.
Delete account: NOTE: THIS REQUEST IS TO DELETE ALL OF YOUR DATA FROM THE APP. THE DATA WILL NOT BE ABLE TO BE RECOVERD. IF YOU SIMPLY WISH TO NO LONGER PARTICIPATE IN CARE MANAGEMENT, PLEASE CLICK ON THE OPTION ABOVE.
Tapping this will generate a pop-up box asking you to confirm you wish to delete your account by typing “Delete” into the box and then tapping “Delete” again. This will send an email to Wellframe Technical Support, who will begin the deletion process once the request is received. If you do not wish to delete your account, tap “Cancel.”
NOTIFICATIONS
App Notifications
Checklist reminder: Here you can activate and choose the frequency of when you would like notifications pushed to your device to remind you of items due for completion on your checklist. You can also disable checklist notifications by clicking the “toggle” button off.
Health Event Date: This will send a reminder when you need to enter a date, such as “Delivery Date” or “Surgery Date”. Note this setting is only applicable if you are on a “Date Based” Care Program.
Step Goal Achievement: Here you can toggle on and off whether you do or do not want to be alerted when you have achieved your step goal for the day.
Sound for Task Completion: Turns sound on/off when a task is completed.
STEP COUNT
Checklist Step Tracker: Track your steps on your Checklist and set a daily step goal.
Trace Steps Automatically: Will track your steps automatically, if this is not enabled, you will need to enter your steps manually.
BLOOD GLUCOSE
Glucose Meter: This option will only display if you are currently syncing blood sugar readings to the app via a glucometer device. This setting enables you to connect/disconnect those devices.
Add A Device: Allows you to connect to a Glucose Device via Bluetooth.
If you already have a connected device, the Device Name will appear here.
SECURITY SETTINGS
Screen Lock: Allows you to enable extra security for the app by requiring a PIN or Face ID.
Data Usage Preferences:
Opt in to Usage Data: Here you can toggle on and off whether you will allow Wellframe to collect and analyze data as you use the app.
Opt in to Emails: Here you can toggle on and off whether you will allow Wellframe to occasionally send you announcements to your account email address about recent updates and services.
Opt in to Data Reporting: Here you can toggle on and off whether you will allow Wellframe to occasionally ask you for feedback on the Wellframe product experience.
SUPPORT AND FEEDBACK
Help Center: This links to our Wellframe Member Support Center website, where you can browse guides for each feature of the app.
Submit Feedback: This generates a pop-up comment box where you will be asked to suggest any feature improvements.
TERMS AND AGREEMENTS
Privacy Policy: View the latest Privacy Policy for the app.
End-User License Agreement: View the latest End-User License Agreement for the app.
Open Source: View the latest guidance on how Wellframe uses Open Source Software to continue to develop and innovate the user experience.
Legal Notices: View the latest Legal Notices for the Wellframe app.
Log Out: Tap here to log out of the app. Note: You do not need to “log out” each day. The app remains secure, and logging out can cause you to miss important notifications.